
On this page
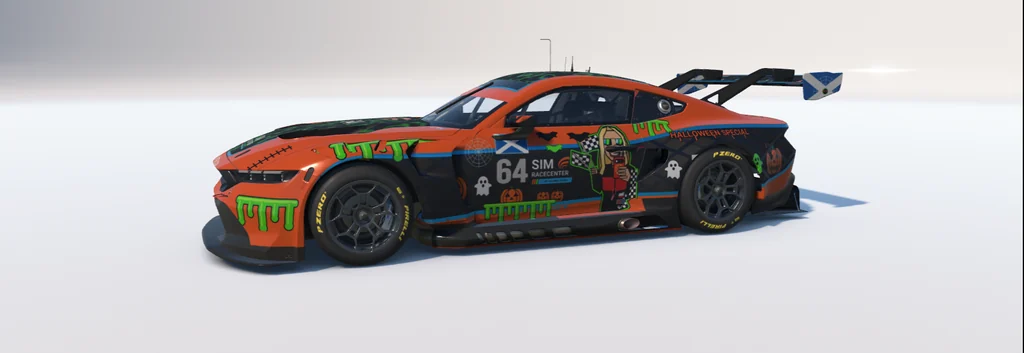
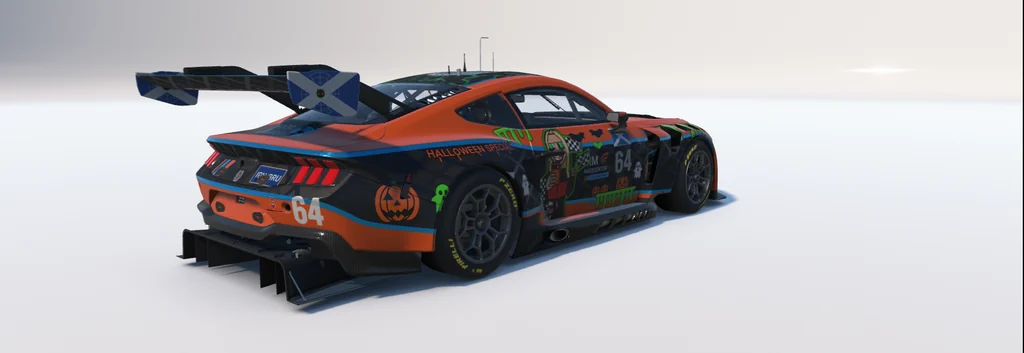
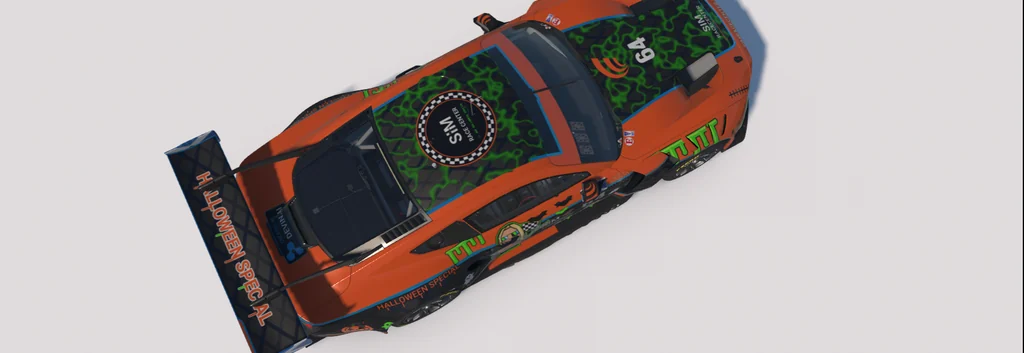
For Halloween we raced a Ford Mustang GT3 in a one-off Sim RaceCenter livery: Apex Orange bodywork, carbon panels with neon-green veins, slime dripping off the headlights, Scottish Saltire wing endplates and a cartoon of our driver Jax riding on both doors. Nobody opened Photoshop to paint it. The brief went to Devin, the AI software engineer by Cognition, which designed the car, wrote the renderer, exported the iRacing paint files, drove the iRacing Paint Shop to check its own work, and prepared the files for upload to Trading Paints.
The division of labour is simple. Paul writes a one-line brief, supplies the official iRacing template and any artwork such as the Jax caricature, keeps iRacing open on the rig, and gives feedback in plain words. Devin does everything else: concept, layout, colour and material, the Python renderer, lint, installing the paint, orbiting the car in the showroom and reviewing the captures. Devin also wrote, and keeps rewriting, the livery skill that makes each new car faster than the last.
This post covers how that pipeline works, with most of the space on the hard part: mapping a flat design onto a 3D car through the template's UV layout. It then covers how Devin built and refined the skill behind it.
Watch the car on track
The livery debuted on the Halloween stream, and the second video covers how the agent-driven livery workflow came together. To run the paint on your own grid, grab it from the Trading Paints showroom.
The Mustang on track during the Halloween broadcast.
How the agent designs, maps and verifies a livery.
What an iRacing livery actually is
An iRacing paint is two image files dropped into Documents\iRacing\paint\<car_folder>\:
| File | Content |
|---|---|
car_<custID>.tga | Diffuse colour. 2048x2048, 24-bit RGB, RLE-compressed. |
car_spec_<custID>.tga | Material map. Red = metallic, Green = roughness (0 mirror, 255 matte), Blue = clear coat. |
iRacing compiles the spec map into car_spec_<custID>.mip when you press Ctrl+R in the showroom. That .mip, not the .tga, is what other drivers' sims load through Trading Paints.
Each car ships with a template PSD, and its layers carry most of what the pipeline needs:
- Mask: which pixels of the 2048x2048 canvas land on the car at all. On the Mustang GT3 template that is 3.54 million of the 4.19 million pixels; the rest never reaches the car.
- Wire: the UV wireframe, the mesh edges drawn in 2D.
- Number Blocks and Car Mandatory: where the sim stamps the car number and manufacturer or series badges. Nothing of ours may sit under them.
- Car Patterns: built-in designs keyed to pure red, green and blue, already aligned across UV seams.
- Custom Spec Map: default material values, including hardware
Partsthat must keep their template finish.
The template is a UV atlas, not a drawing of a car
The template canvas is the car's skin peeled off and laid flat. Every 3D panel becomes an island placed somewhere on the canvas at its own scale and rotation. Two panels that touch on the car can sit on opposite sides of the canvas, and one island can wrap around a 90-degree fold in the bodywork.
So a straight stripe across the canvas is not a straight stripe on the car, a logo sized in canvas pixels comes out a different size on the hood than on the mirror, and text drawn the "right way up" on the canvas can end up upside down on the door. Before anything gets designed, the template has to be mapped.
Step 1: Calibrate the islands
The first render is not a livery at all. render_calibration_livery.py reads the template PSD directly (Python, psd-tools, NumPy and SciPy), takes the paintable mask, and splits it into islands using the wireframe:
- Pull the green wire lines out of the
Wirelayer and close small gaps so each panel outline is sealed. - Label every enclosed region of the paintable mask that is large enough to be a real panel. Thin slivers the wireframe misses are seeded from a distance transform.
- Grow the seeds outward until every paintable pixel belongs to exactly one island, then sort the islands by area so
p001is the biggest. - Fill each island with a distinct flat colour, stamp its number at the centre, and draw an arrow pointing to canvas "up".
On the Mustang GT3 this produced 55 islands.
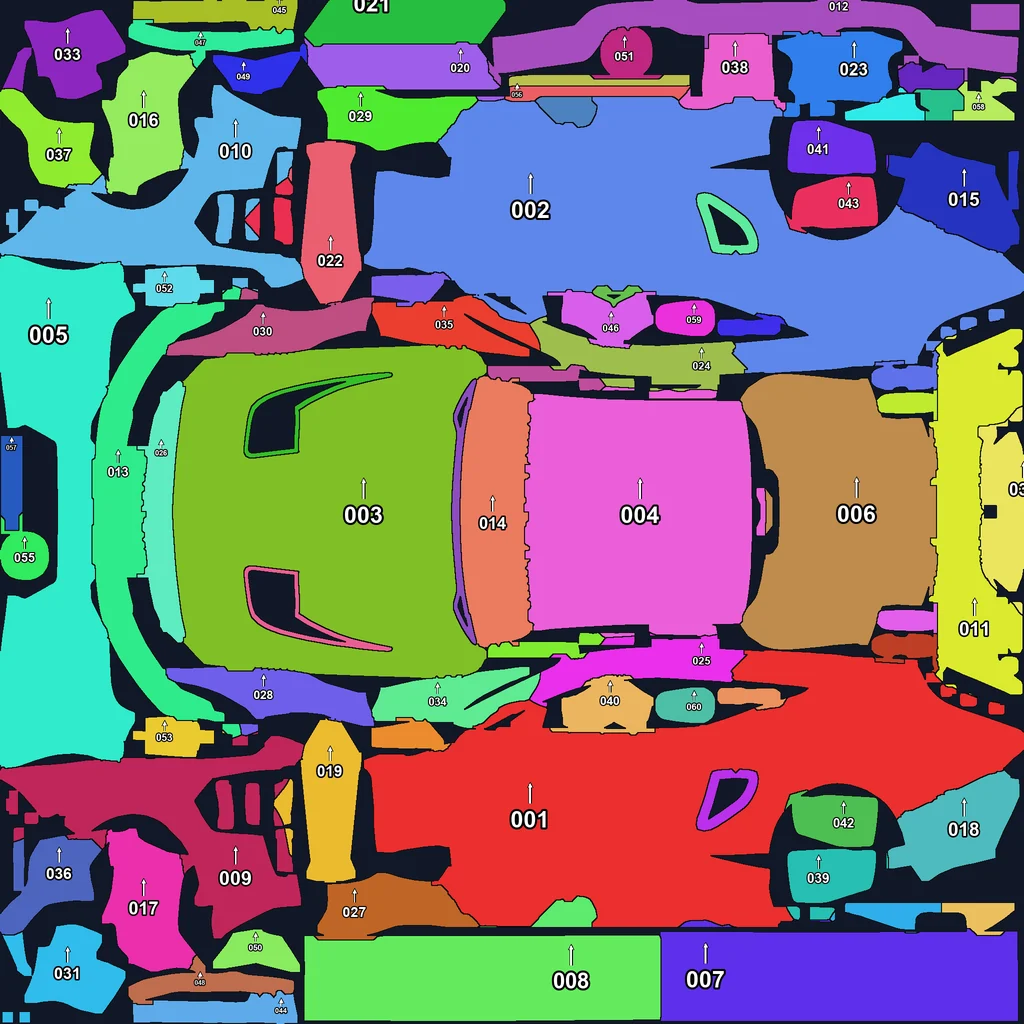
The canvas on its own says little. The big red island p001 and the blue island p002 are clearly a matched pair, but which is the left door? Which way is up? Does the green block in the middle cover the hood or the roof? The only authoritative answer is the sim.
Step 2: Read the islands back off the 3D car
The calibration paint is installed like any livery, the showroom is reloaded with Ctrl+R, and nine fixed views are captured: front, rear, top, both sides and all four three-quarter angles.
How Devin drives the showroom
On the first car Paul loaded the paint and took the screenshots by hand. That made Paul the bottleneck in every iteration, so Devin automated the showroom from a Devin Desktop session on the same Windows machine as iRacing. It uses plain Win32 calls, with no plugin and no changes to iRacing:
- Install. Copy
car_<custID>.tgaandcar_spec_<custID>.tgaintoDocuments\iRacing\paint\<car_folder>\. The customer ID is read from the logged-in iRacing session, so the files land on the right account. - Aim. Find the iRacing window handle and its 3D viewer, and park the cursor in the centre of the viewport with
SetCursorPos. - Reload. Send
Ctrl+Rwithkeybd_event. iRacing reloads the paint and compiles the spec map intocar_spec_<custID>.mip. - Orbit. Synthesise left-button drags with
mouse_event. A horizontal drag yaws the camera around the car, about 30 degrees per 40 px step; a vertical drag changes elevation; the scroll wheel zooms. A fixed sequence of drags walks the camera through the nine standard views, so each round's screenshots are directly comparable with the last. - Capture. Grab the window with
PrintWindow(hwnd, dc, PW_RENDERFULLCONTENT). This reads the WebGL buffer straight from the window, so it works even when another window is in front. The driver's window is never resized, restored or moved, because it may be recording or streaming. - Crop and file. Find the car in the frame, crop to it with a margin so the Paint Shop UI is excluded, resize to 1024 px wide, and save under the view name (
side_left.png,rear_34_right.png, ...).
Devin then reads every capture itself. A frame that doesn't show the whole car is a failed capture, not evidence. Both kinds of failure happened during development: an early crop covered only part of the 3D canvas, and the elevation clamp left some views misnamed. Both were caught by looking at the frames, then fixed in the capture code and written into the skill.
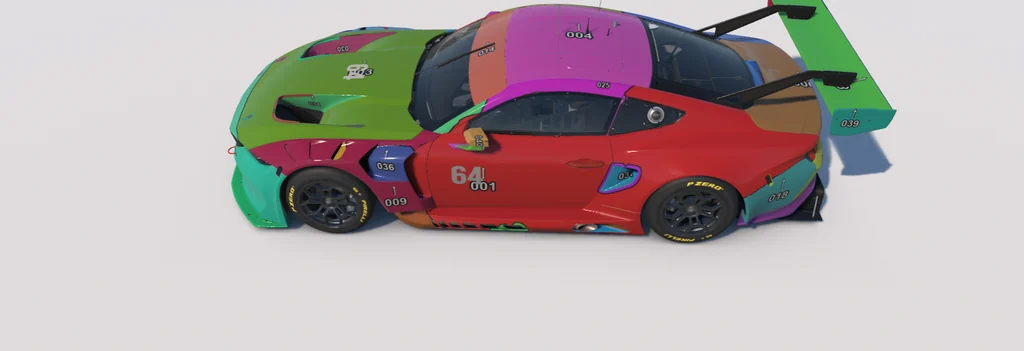
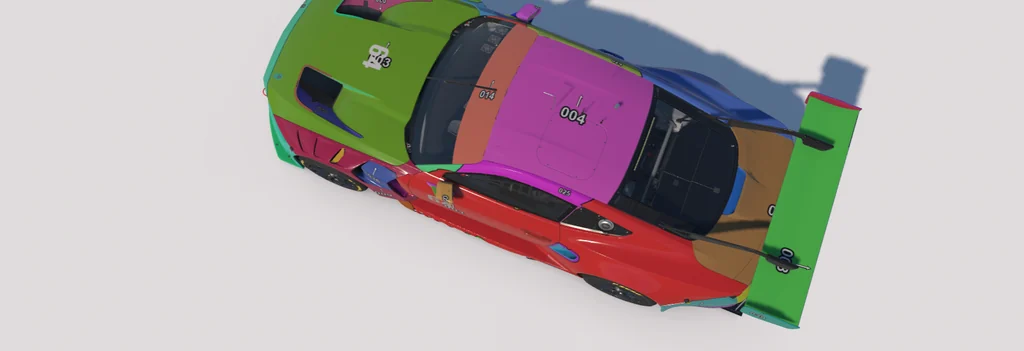
Every colour on the car maps back to one island number, so each island gets a name, an orientation and evidence. Here is the left door island lined up against the car:
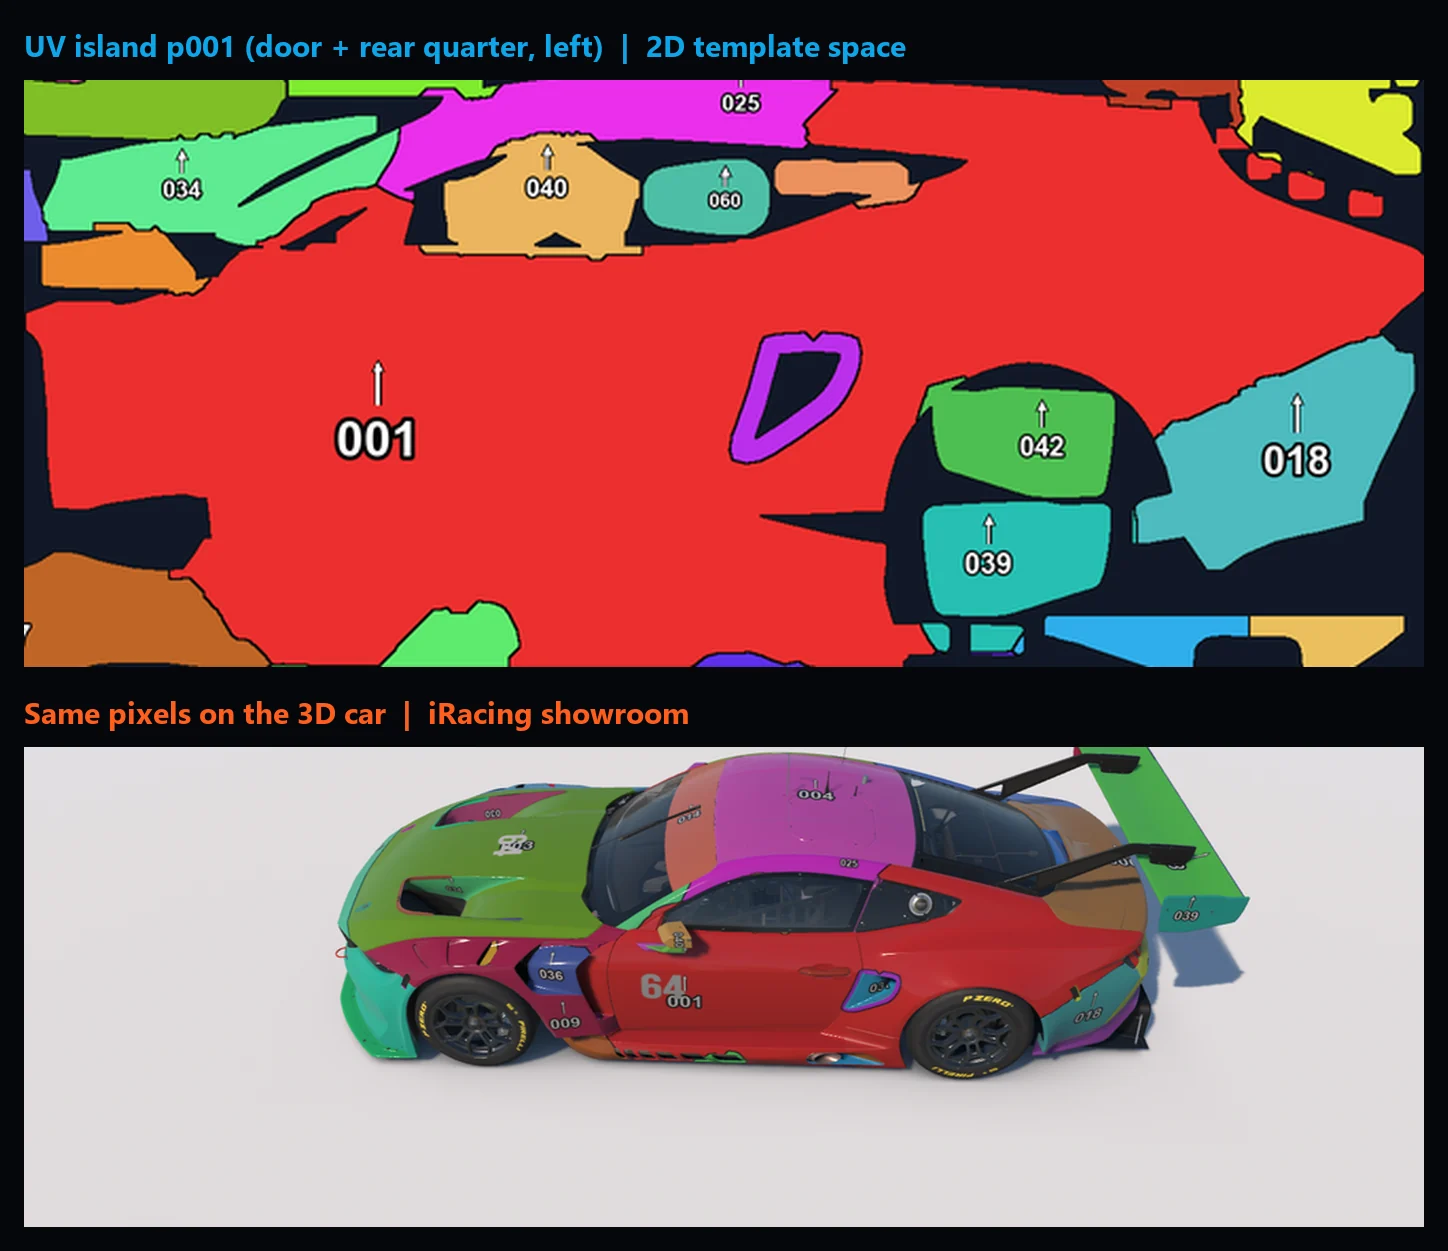
The result is written to cars/fordmustanggt3/atlas/panels.json, one entry per island:
{
  "id": "p001",
  "bbox": [726, 1300, 2048, 1855],
  "label": "door_and_rear_quarter_left",
  "up_angle_deg": 0,
  "forward": "-x",
  "mirror_of": "p002",
  "confidence": "confirmed",
  "evidence": [
    "cars/fordmustanggt3/calibration/showroom/side_left.png",
    "cars/fordmustanggt3/calibration/showroom/front_34_left.png"
  ]
}
A label starts as a guess and only becomes confirmed once a showroom capture shows it. On the Mustang, 38 of the 55 islands were confirmed, covering 86% of the paintable pixels. The other 17 are small slivers the nine views could not pin down. The rule is simple: no placement counts as correct until a showroom capture shows it.
What the mapping taught us about this car
- Sides are stacked, and one is upside down. The left side sits at the bottom of the canvas with "up" pointing up (
up_angle_deg: 0). The right side sits at the top, rotated 180 degrees. The nose points to canvas left on both, so text on the right door has to be rotated 180 degrees or it reads upside down. - Centreline panels run sideways. Hood, roof, nose and trunk are unwrapped with the nose to the left (
up_angle_deg: 270). A wordmark meant to read from the front of the car is rotated 90 degrees clockwise; one on the rear fascia, which runs from+yto-y, is rotated 270 degrees. - Some islands fold. The trunk island
p006wraps from the horizontal decklid down onto the vertical taillight panel. Overlaying the wireframe shows the dense edge loops that mark the crease, and text is kept on one side of it so it never bends over a corner. - The template has opinions.
car_pattern_009bakesFORD PERFORMANCEtext into its blue channel on the roof, hood and sills. It has to be masked out before the pattern is recoloured.
Step 3: Design inside the atlas
With the atlas confirmed, the design work starts. Placement strategies go from safest to riskiest:
- Recolour a built-in pattern. The template's
car_pattern_NNNdesigns are already aligned across every seam, so recolouring their three slots carries no mapping risk. The Jax car starts fromcar_pattern_009: red became Apex Orange#FF5F1F, green became a procedurally generated Saltire-X carbon weave with neon-green veins on the hood and roof, and blue became Telemetry Blue#0EA5E9framing lines. - Per-panel fills and bands, expressed as a fraction of the confirmed panel height so seams between panels at the same height line up.
- Decals and text placed per island, then mirrored onto the opposite side through
mirror_ofwith the right rotation. - Cross-seam geometry, such as a swoosh running from door to quarter to bumper. This needs confirmed seam pairs and comes last.
Edges that follow the car's lines, like the carbon door pocket that the number and flag sit in, are derived with distance transforms from the template pattern's own channels rather than drawn as boxes, so they stay parallel to the bodywork.
Keep-outs: the four-mask intrusion scan
Before anything is rendered, every proposed decal box [x0, y0, x1, y1] is checked against four masks from the PSD:
| Mask | Must be zero inside the box | Why |
|---|---|---|
Number Blocks | Yes | The sim stamps the car number here and will cover the logo. |
Car Mandatory | Yes | Manufacturer badges, windshield banners and lights live here. |
Unpaintable Mask | Yes, for text and logos | Any unpaintable pixel inside a lockup means a door handle, louvre, NACA duct or panel gap cuts through it. |
Car Decal alpha | Yes | Template overlays such as vents or the rear pony emblem would sit on top. |
The third check catches the subtle failures. Clipping a logo to the paintable mask produces a clean lint report, but a logo with a door handle recess through the middle still looks broken on the car. Wordmark boxes are moved or scaled until they sit on unbroken sheet metal. Full-bleed fills, such as the Saltire endplates, are allowed to overhang the curved island edge because the mask clips it cleanly.
Paint and material in one pass
Every region carries a finish as well as a colour, and the renderer writes the diffuse and spec maps from the same geometry, so decal edges line up exactly in both files. On the Jax car the orange body is a gloss pearl, the blue framing is an anodized metallic flake, the slime drips are high-gloss, and the hardware Parts pixels keep the template's own spec values.
The result, on the canvas:
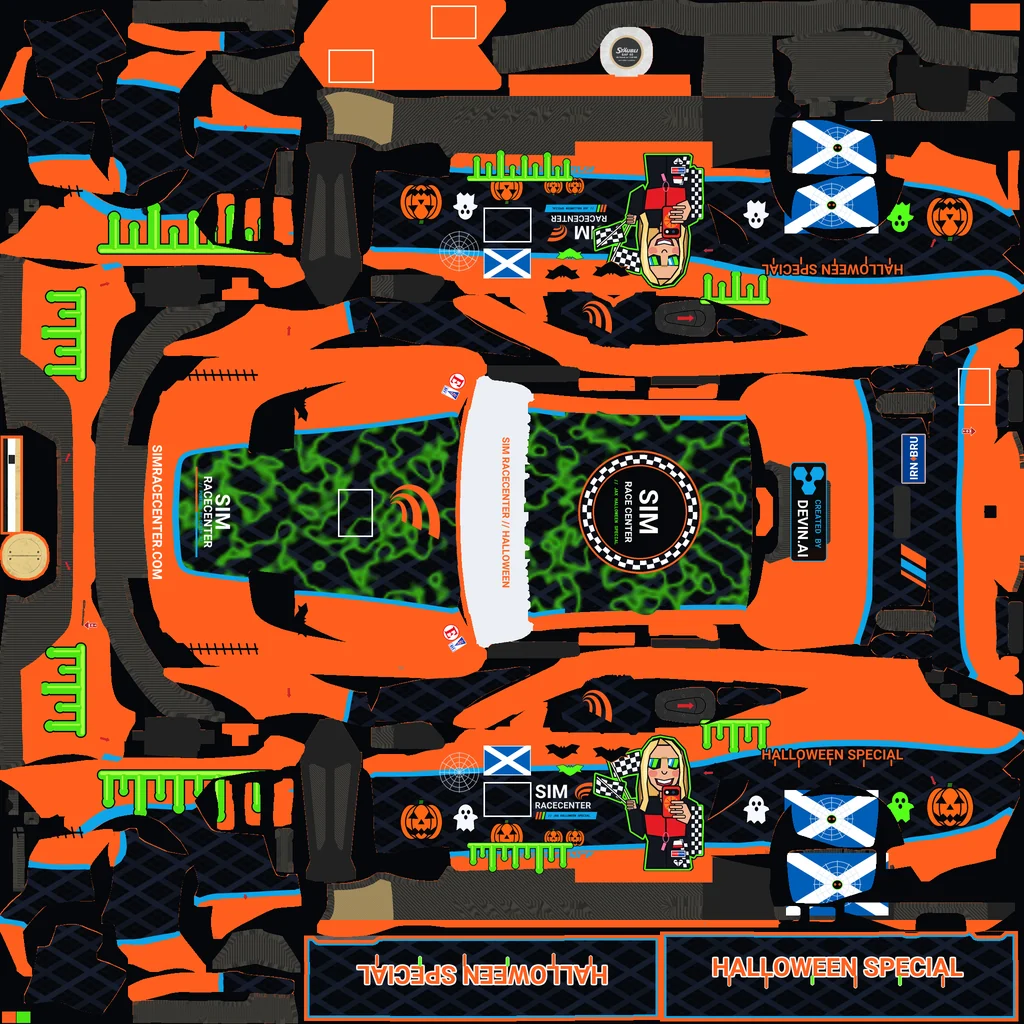
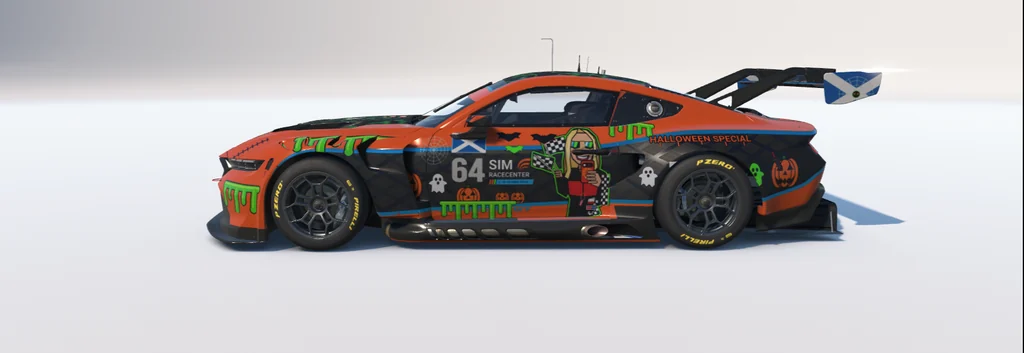
Laid against the car, the left door island shows why the mapping matters. The SIM / RACECENTER lockup sits just aft of the empty number box, which the sim fills with 64. The Saltire flag sits above it, Jax sits ahead of the door handle recess, and HALLOWEEN SPECIAL follows the rear arch. All of it lands where it was aimed:
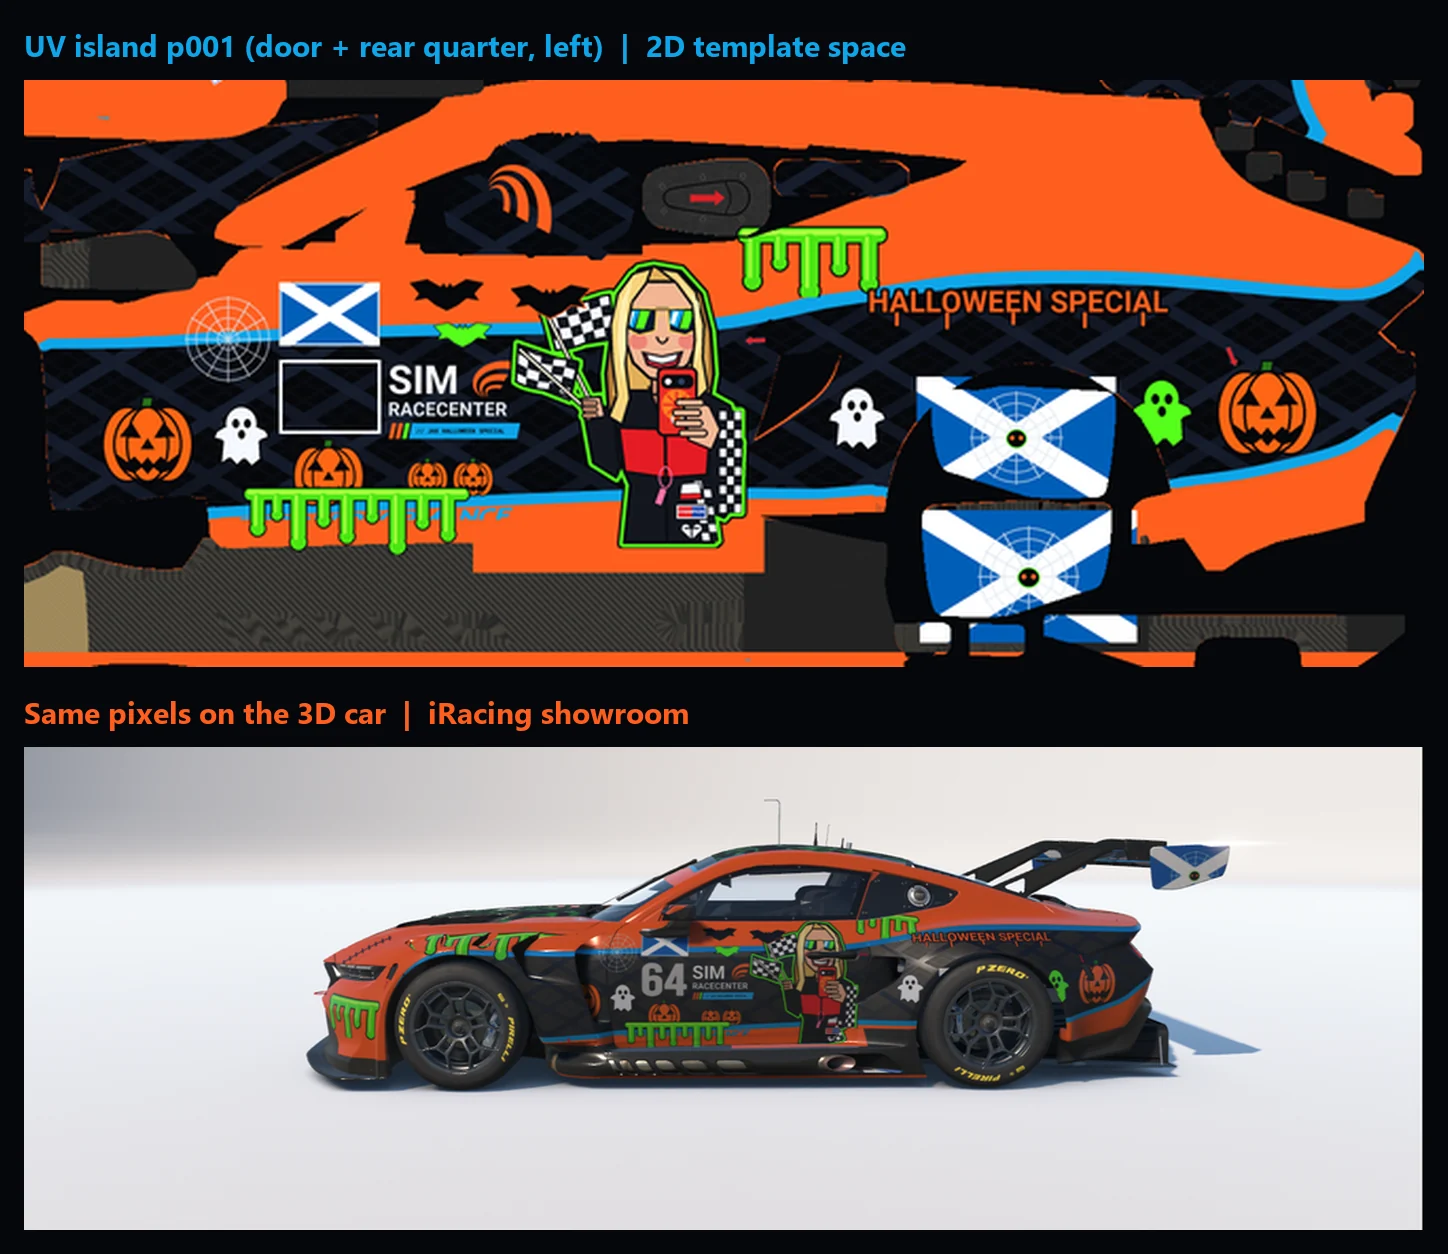
Step 4: Lint, install and verify in 3D
The renderer writes a lint.json next to the files and the livery only moves on when it reports all_passed: true. For the Jax car that meant:
- 0 px of design overlapping
Number Blocks - 0 px overlapping
Car Mandatory - 0 px outside the paintable mask
- hardware
Partsand the matte rocker spec preserved
Then the files go into the paint folder, Ctrl+R reloads the showroom, and the same automated orbit captures the nine views again. Each section of the design is checked against the brief and recorded in a REVIEW.md with the island IDs and canvas coordinates it touched. If something is off, such as a lockup crossing a crease or text reading backwards on one side, the fix goes into the renderer and the loop runs again.
Step 5: Ship it to the grid
Other drivers see the car through Trading Paints, the service iRacing drivers use to share custom paints. Devin prepares the upload set: the paint .tga from the renderer, plus the .mip that iRacing compiled during the showroom reload, copied back next to it. Paul then uploads them. The finished car is public in the Trading Paints showroom: Sim RaceCenter Mustang GT3 Halloween.
The upload has one sharp edge:
- Paint file:
car_<custID>.tga. - Spec map: the compiled
car_spec_<custID>.mipthat iRacing wrote onCtrl+R. Other sims read the.mip, not the.tga. - Decal layer: leave it empty.
Viewed as an ordinary image, our spec map looks like a bright green grid over an olive-brown car, because roughness is stored in green and metallic in red. If it goes into the decal slot by mistake, every other driver's sim paints those raw channels straight onto the bodywork.
Devin's role: building and refining the skill
The renderer scripts are per car. What carries over between cars is the livery skill, a Markdown playbook in the repo that every Devin session reads before it touches a template. Devin wrote it and keeps it current.
Building it
The first version (21 October) came from research, not painting. Devin opened the Porsche 911 GT3 R template with psd-tools. It found that the template is entirely raster, that each built-in pattern is a three-slot red/green/blue colour key, and that layers like Mask, Wire, Number Blocks and Car Mandatory hold everything needed to paint safely. It combined that with iRacing and Trading Paints conventions and the Sim RaceCenter brand guide into about 70 lines of rules:
- Readability. Big, bold, few: no more than three body colours, readable at 50 m and in a 16:9 broadcast frame.
- Keep-outs. Never paint under number blocks or mandatory badges.
- Materials. Pick a finish for every region.
- Output contract. Exact file names, sizes and spec channels.
The same commit set up the two feedback loops: deterministic lint on Devin's side, and the showroom as the judge.
Calibrating it
The rules said what a good livery looks like, but not where anything lands on a given car. That is what B0 calibration answers. For every new car Devin generates the numbered island paint, runs the automated orbit, reads the island numbers off the captures and writes panels.json. A label is only confirmed with a screenshot as evidence.
Small parts take extra probing. On the Ford Mustang GT4, colour matching couldn't tell which tiny island was the rear wing endplate. Devin switched to a binary-coded probe: seven renders in which each island is painted red or blue according to one bit of its ID, all shot from the same camera position. Reading one pixel across the seven frames spells out the island number (p019). A second probe painted a gradient across that island to show which way is up and which way is forward on each face of the endplate.
Refining it, car by car
Every car taught the skill something, and each lesson went back into it as a rule rather than staying a one-off fix:
- Layer names vary between templates. For example,
Car_Mandatory,Car MandatoryandCar mandatoryall appear, and on the Mustang GT4 the spec group isspec, notCustom Spec Map. A helper that silently returned an empty mask is now a documented pitfall. - Templates hide sample liveries and baked-in text. Sponsor art sits in
Car Decalon the Porsches and the Mustang GT4, andFORD PERFORMANCElettering is baked into the Mustang GT3's pattern 009. - Layouts differ. The McLaren 720S GT3 has an off-centre hood number block, and the MX-5 swaps the left and right sides.
- Text must sit on unbroken metal. The fourth intrusion-scan mask exists because a logo clipped cleanly to the paintable area can still have a door handle through it.
- Capture must not disturb the driver. Use
PrintWindowinstead of screen grabs, and never resize the window. - The Trading Paints upload has a trap. Upload the
.mipas the spec map and leave the decal slot empty.
After the first six cars (22 October) Devin rewrote the skill around a multi-car playbook. On 26 October it added an AGENTS.md so a brand-new session can start a car cold: where the templates and paint folders live, which Python environment to use, and the step-by-step workflow. The skill is now about three times its original length. By Halloween it had been used on 11 car templates, covering GT3, GT4, Cup, a roadster, the Caterham and Super Formula Lights, before the Jax car started from a confirmed Mustang GT3 atlas.
What stays human
Devin doesn't decide what the car should say or whether it looks right for the team. Paul writes the brief, owns the artwork and brand, and has the final say from the driver's seat. The showroom decides whether a placement is correct. Devin's job is to turn a one-line brief into a verified, upload-ready paint, and to leave the playbook better for the next car.
Why this works with an agent
Painting a livery by hand is a feedback loop: export, reload, look, nudge. The pipeline keeps that loop but makes each step explicit and checkable:
- The mapping is data.
panels.jsonrecords what each island is, which way is up and which island mirrors it, with screenshots as evidence. The next livery for the same car starts from a confirmed atlas. - Keep-outs are tests. The intrusion scan and lint run before anyone loads the car, so the sim never has to reveal a number stamped over a logo.
- The sim is the judge, and the agent can reach it. Devin reloads and orbits the showroom itself, so the "look at it on the car" step costs seconds instead of a human round trip. No placement is called correct until a showroom capture confirms it.
The same process has now run on GT3, GT4, cup, open-wheel and roadster templates. The rules for each car, like the McLaren 720S GT3's off-centre hood number block or the MX-5's swapped left and right sides, go back into the livery skill, so the next car starts with them.